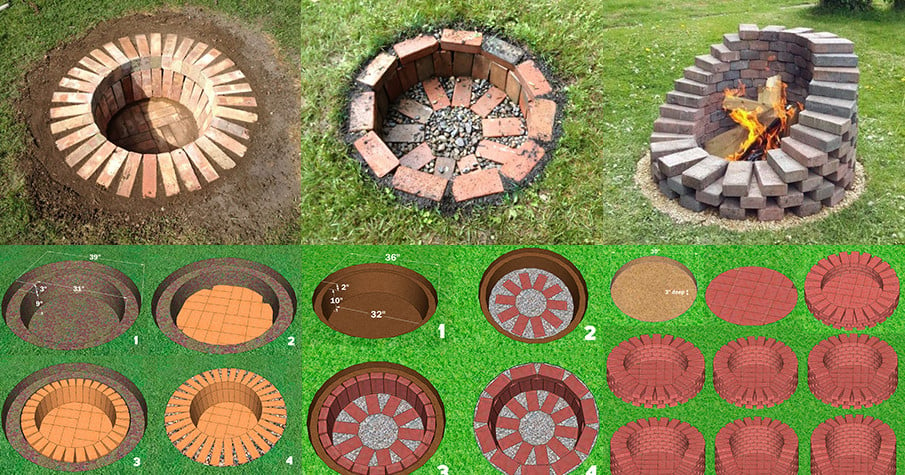
Ready to build the backyard fire pit you’ve always wanted? We’ve got you covered with five free DIY plans inspired by the most popular round brick designs. All the research is done, from cost estimates to the number of bricks you’ll need. We’ve even sorted out the precise circular geometry for a perfect shape. A cool pyramid design is included too. The planning is finished, so it’s time to start building.
Constructing your own fire pit is a straightforward project with these simple plans and a handful of materials. You’ll be gathering around an outdoor fire before you know it. These plans are designed for simplicity, requiring no glue, just bricks and some clever engineering. You can build them on any grassy or soil covered spot in your yard. Because these are inground fire pit designs, they require digging a hole and won’t work on a patio.
Which Bricks are Best for a Fire Pit?
While you can certainly use fire bricks for enhanced stability, it’s not strictly necessary. Firebricks are typically found inside wood stoves and pizza ovens, where they can handle temperatures up to 1200 degrees Fahrenheit. An outdoor fire pit usually operates between 800 and 1000 degrees, making standard bricks a perfectly suitable choice. If you prefer firebricks, you can find them at landscaping centers. The color, whether red or white, is simply a matter of personal design preference.
The Cheapest Brick to Make a Fire Pit
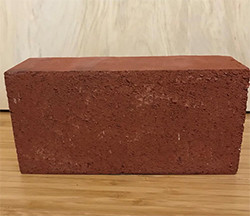
All six plans detailed below are based on a specific size and type of red brick.
The Watsontown Brick, measuring 7.5 inches by 3.75 inches, is a clay red standard brick available at Lowe’s stores nationwide. Its dimensions are 7.5″ L x 3.75″ W x 2.25″ H, and it costs just $0.88 per brick.
This is the most budget friendly and appropriate brick we found for your DIY fire pit project. Of course, it’s just one option among many, and your bricks might be slightly different in size. That’s perfectly fine. These measurements are intended as a guide, not a rigid rule. Simply adjust the size of the hole you dig to fit your materials.
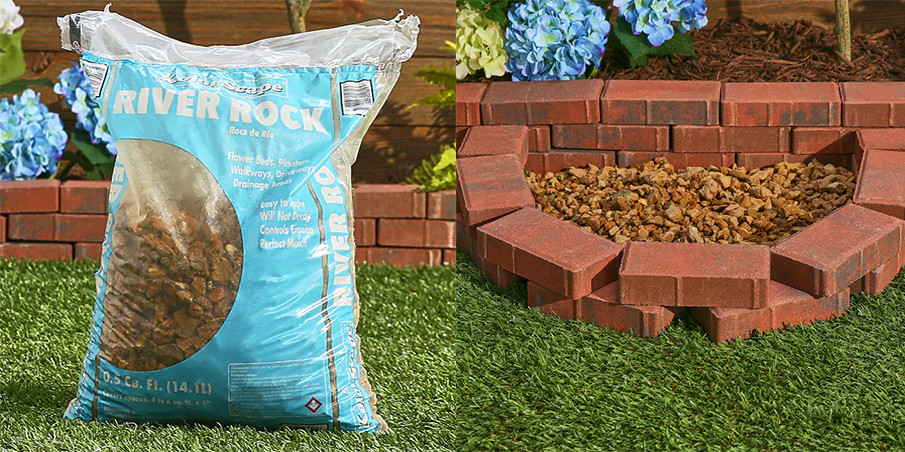
What to Use to Fill Gaps Between Bricks
When constructing a brick fire pit, filling the gaps between bricks with small stones or pebbles is a good idea. This prevents the bricks from shifting over time and keeps your design intact. One great option is to use river rock pebbles, which you can find at Lowe’s.
Tools Needed to Build a Fire Pit
As long as you have all your materials ready, building a brick fire pit with these plans should take about two to three hours. You’ll need the specified number of bricks, some pea gravel, a shovel, and a length of rope for measuring and marking your circle. Some of the designs also call for a mason chisel and a hammer.
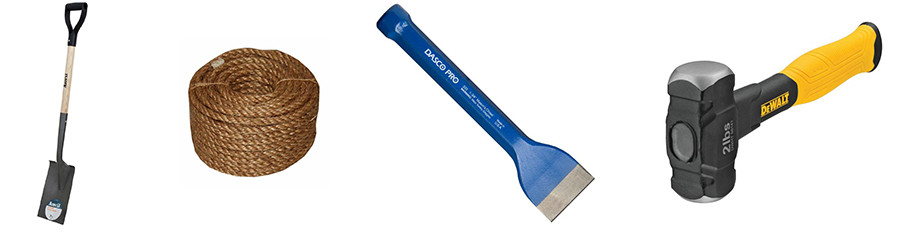
From left to right: Shovel, Rope, Mason Chisel, Mallet or Hammer
5 FREE DIY PLANS
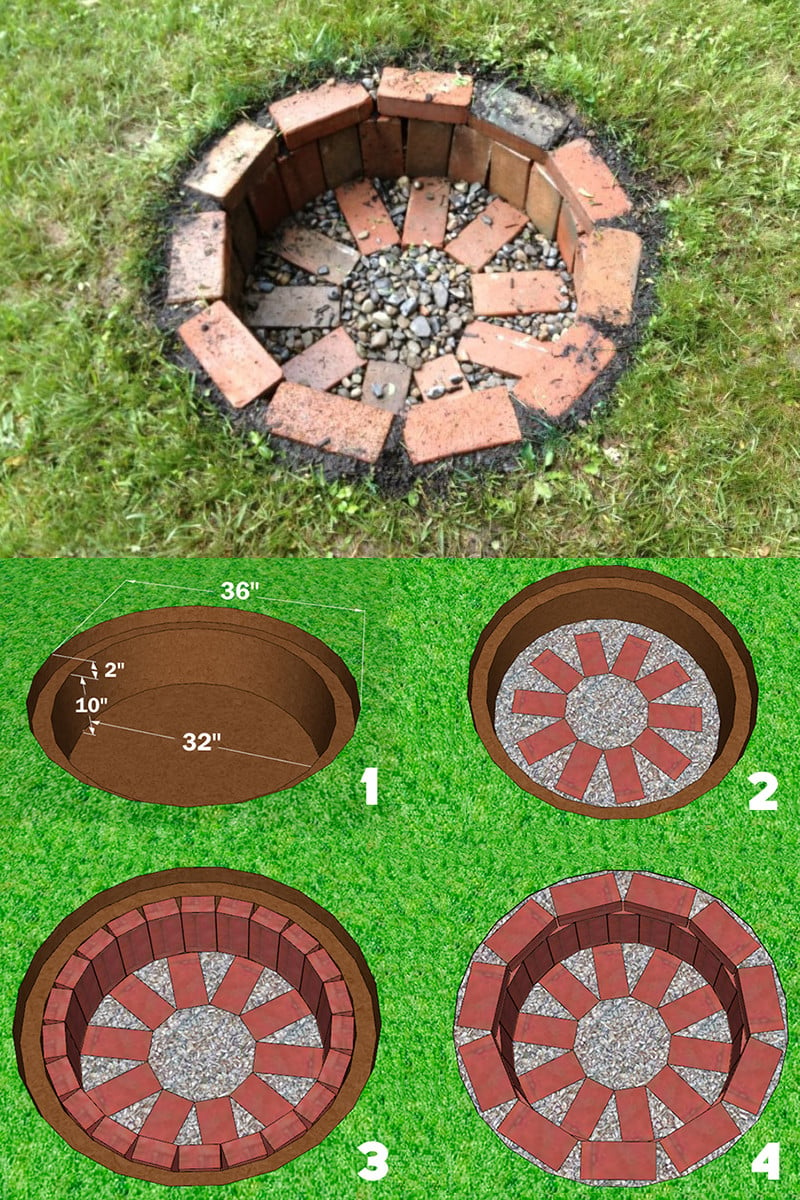
1. Small and Easy Round Firepit Plan
Idea Picture 1:
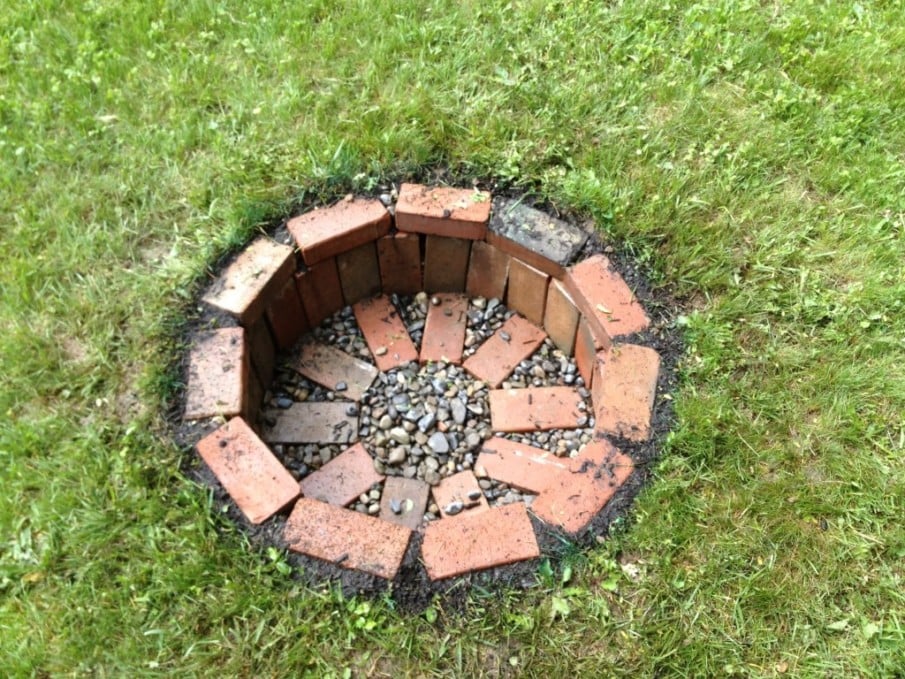
This charming little fire pit is quite simple to construct by following the plan below.
DIY Plan 1:
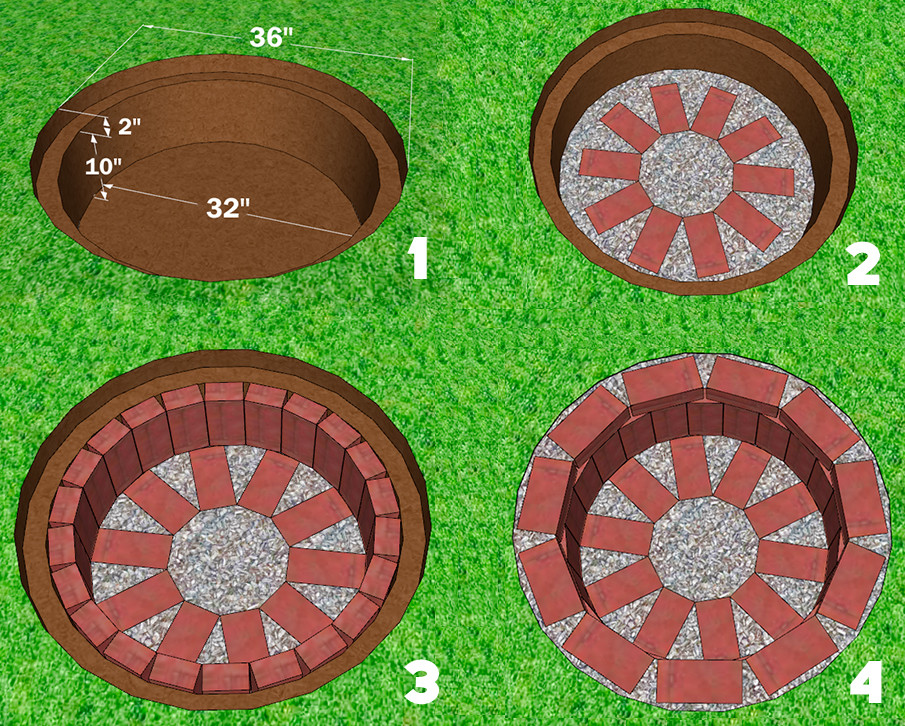
Overall Diameter: 36″
How many bricks are needed: 43
Estimated cost: $.88 x 43 = $37.84 in bricks, based on the plan’s dimensions, plus the cost of gravel.
Building Steps for Plan 1:
Your first step, as with all these projects, is digging a hole. For this plan, you need a hole with a 32 inch diameter and a 12 inch depth. Next, excavate a bit more dirt around the edge to form a lip that is 2 inches deep and 2 inches wide. This circular lip will hold the top ring of bricks. Arrange the first circle of bricks on the bottom in a sunburst pattern. Fill the base with gravel and make sure it’s level. Pea gravel or small crushed landscape rocks work best. Construct the walls of your pit by placing bricks upright, side by side, around the circle until you reach the top of the lip. You can add more gravel to the bottom to help support the bricks. Finish by creating the final outer circle of bricks, using gravel again as a firm base for the design.
Feel free to add or remove some dirt or gravel as needed to ensure the bricks are held tightly in place. While the dimensions are provided, think of them as flexible guidelines.
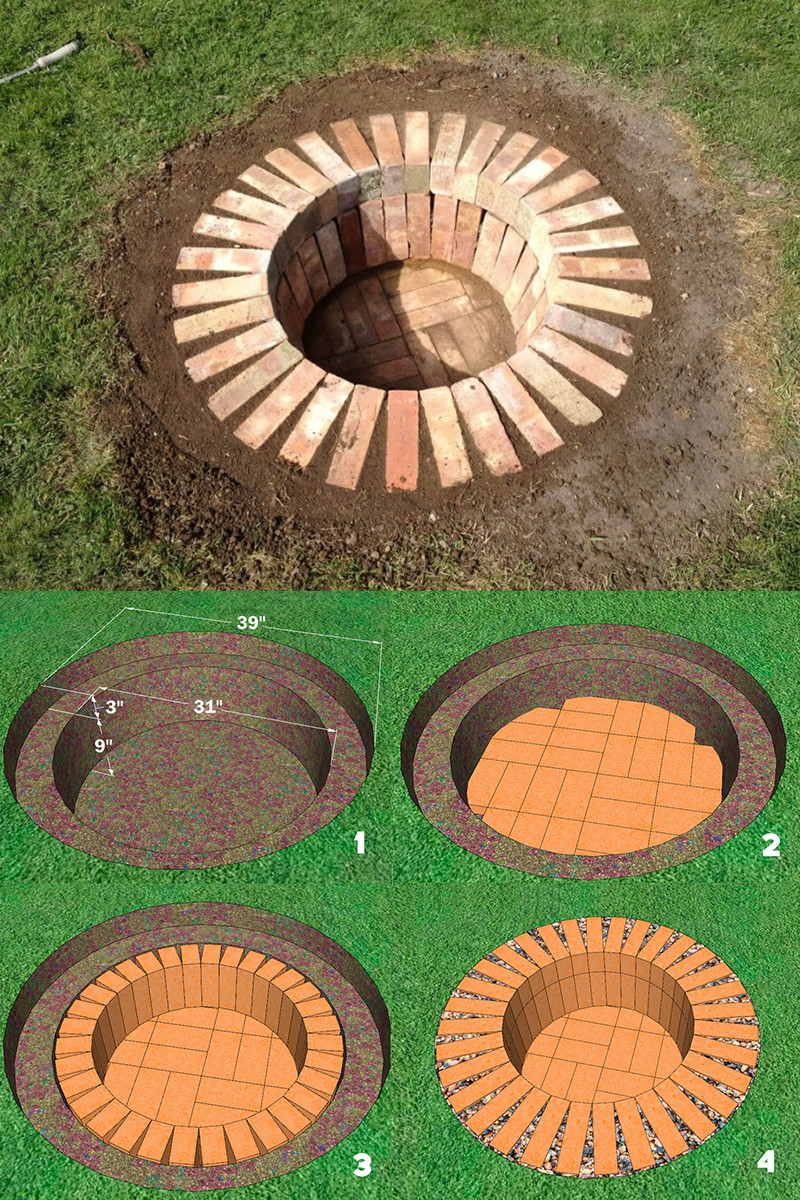
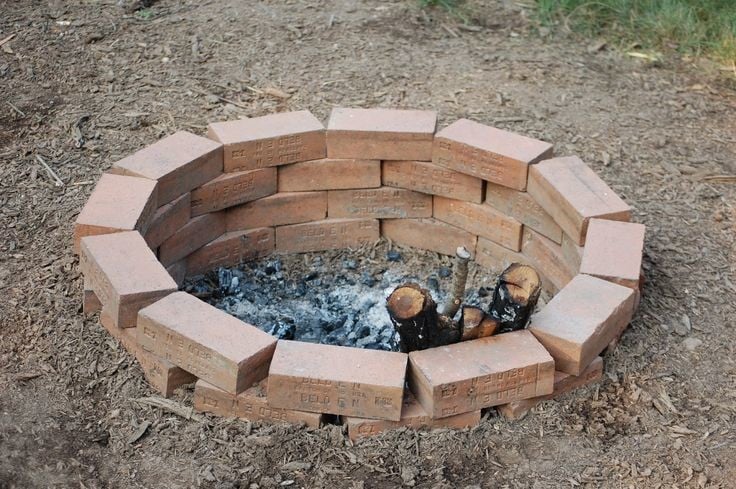
2. Awesome Homemade Brick Clad Firepit
Idea Picture 2:
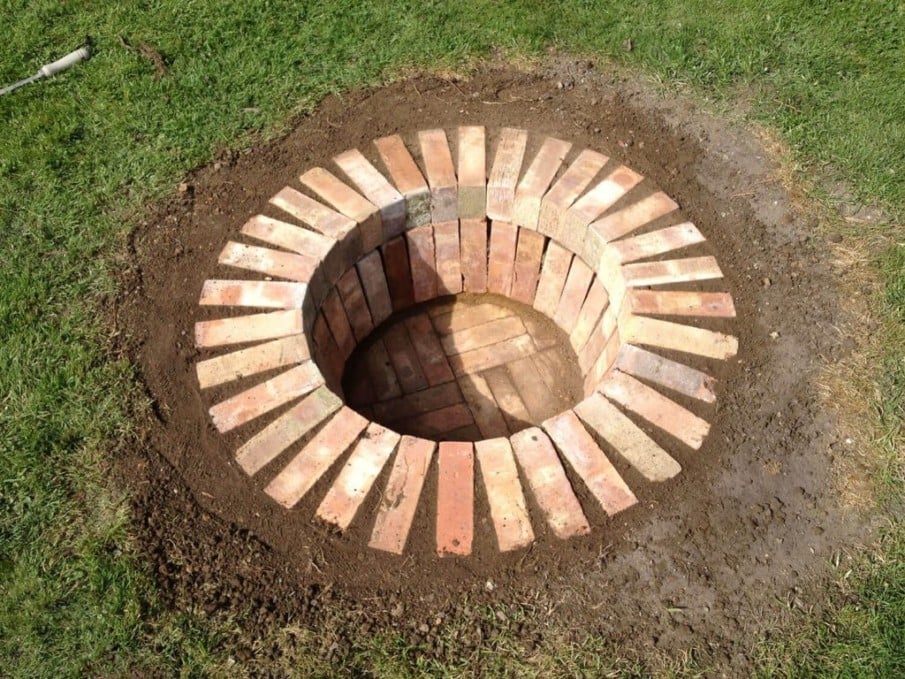
The inspiration photo and the plans show a slightly different floor for the fire pit. By using the photo above as a model but fitting the bricks together as shown in our plan below, you can save on a few bricks. You’ll need a chisel to make the bricks fit together snugly.
DIY Plan 2:
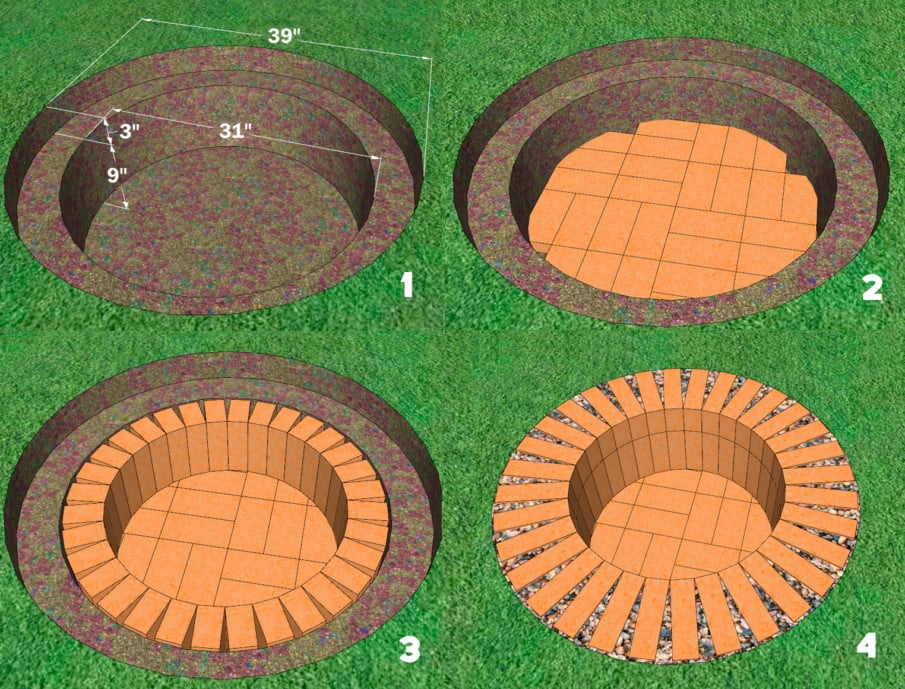
Overall Diameter: 39″
How many bricks are needed: 92
Estimated cost: $.88 x 92 = $80.96 in bricks
This plan requires a total of 92 bricks to build, with an estimated brick cost of $80.96. It’s also recommended that you fill the gaps in the top layer with gravel, as shown in step 4 of the image, rather than just dirt as seen in the original design.
Building Steps for Plan 2:
Start by digging a hole that is 12 inches deep and 31 inches in diameter. Next, dig out an inner lip that is 4 inches wide and 3 inches deep, creating an outer circle with a 39 inch diameter. Refer to step #1 in the illustration for specifics. Lay the bottom layer of 28 bricks in the pattern shown in step 2, using a hammer and chisel to break off any excess pieces for a tight fit. Place the second row of 32 bricks in a circle, standing them on their short side as detailed in step 3. Finally, lay the upper layer of 32 bricks in a circle and fill any gaps with gravel. For an exact match to the design, make sure to align the upper bricks with those in the second layer, as shown in step 4.
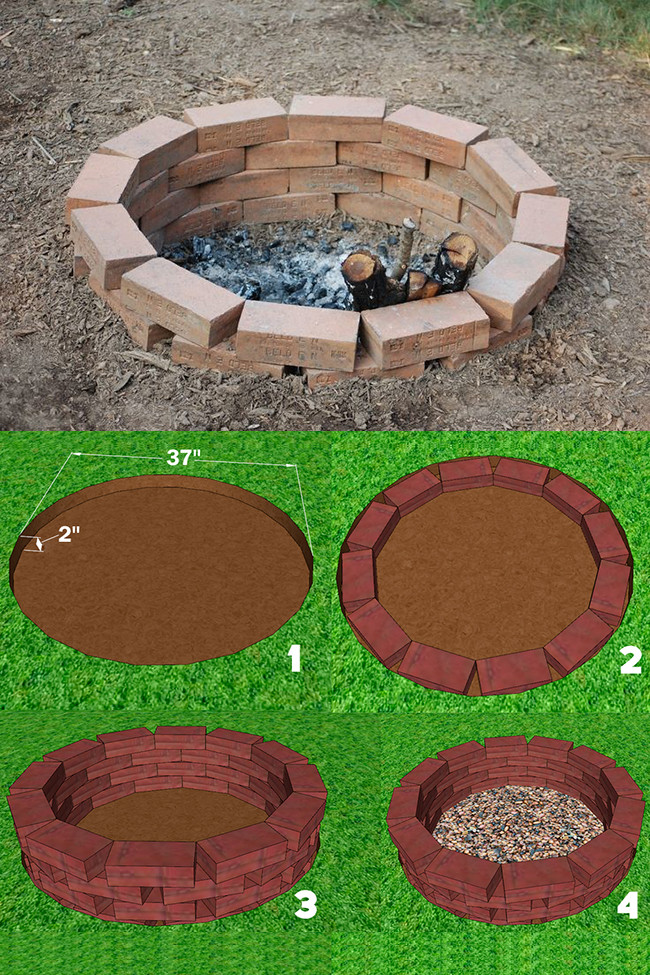
3. The Cheapest Circular Brick Firepit Plan
Idea Picture 3:
This design is the simplest and most affordable of the six brick fire pit plans. The photo shows two layers above ground and two below, but you’ll see in the plan that one layer is in ground with three above. You can easily adjust this based on your preference. To save money on bricks, you could even have just two layers above the ground.
DIY Plan 3:
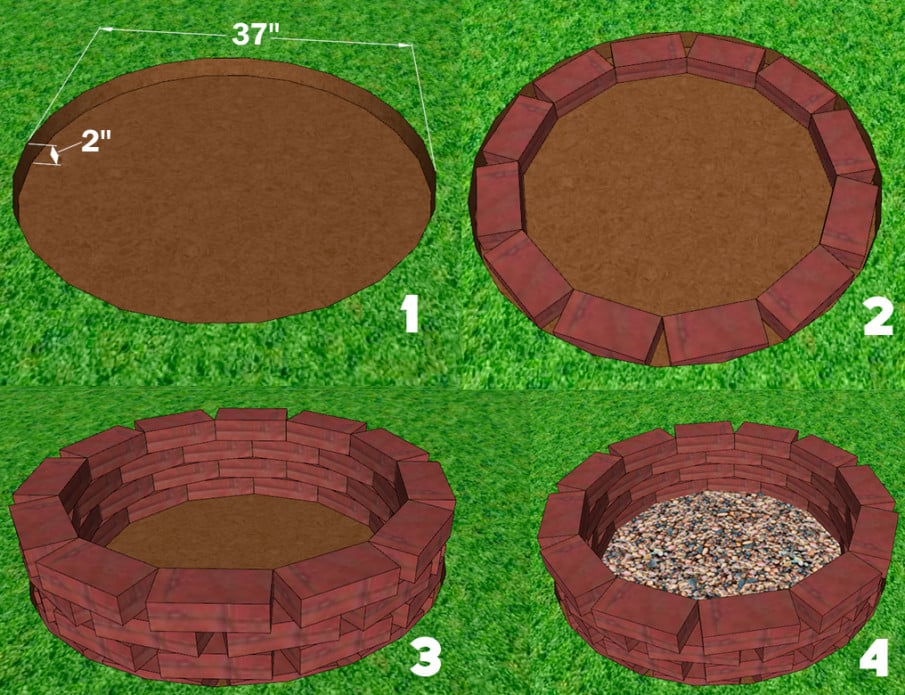
Overall Diameter: 37″
How many bricks are needed: 48
Estimated cost: $.88 x 48 = $42.24 in bricks, plus the cost of a bag of gravel.
This plan is incredibly straightforward and doesn’t even require a brick floor inside the fire pit. Each layer is constructed from 12 bricks.
Building Steps for Plan 3:
Dig a hole that is one or two bricks deep (2″ or 4″) and has a 37 inch diameter. Lay down your first layer of bricks to outline the circular hole, as shown in step 2. Then, stack two or three more layers on top, making sure each new layer overlaps the gaps in the one below it, as illustrated in step 3. Fill the bottom with some gravel. That was simple, right?
4. Large Round Brick Firepit Plan
Idea Picture 4:
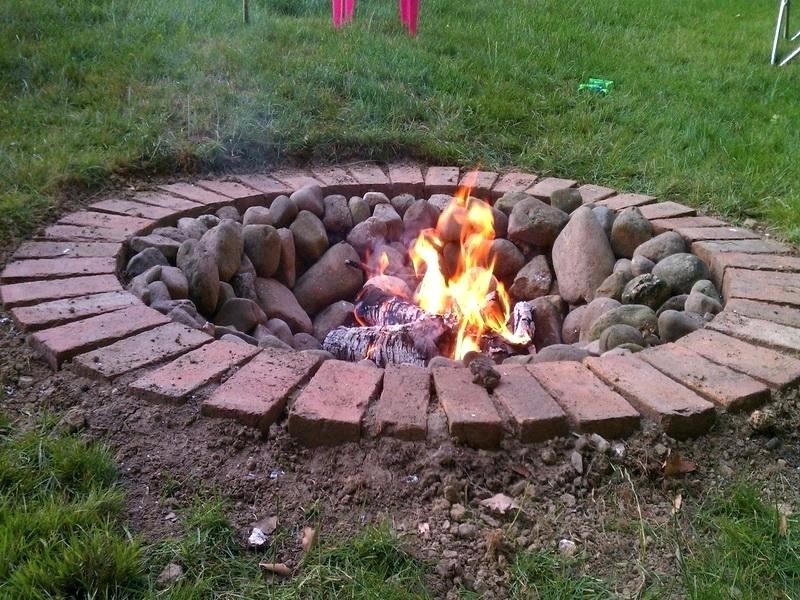
This is a slightly larger fire pit, which means it will take a bit more time to build, but the result is well worth the effort. It resembles a sun, with its brick rays and a fiery center. The large river rocks or tumbled stones really enhance the atmosphere. You can buy these small boulders at landscape centers or, if you’re lucky, find them on your own property. Look for rocks similar in size to those in the image. Using rocks creates a more design focused fire pit, but you can also fill it with gravel if you prefer.
DIY Plan 4:
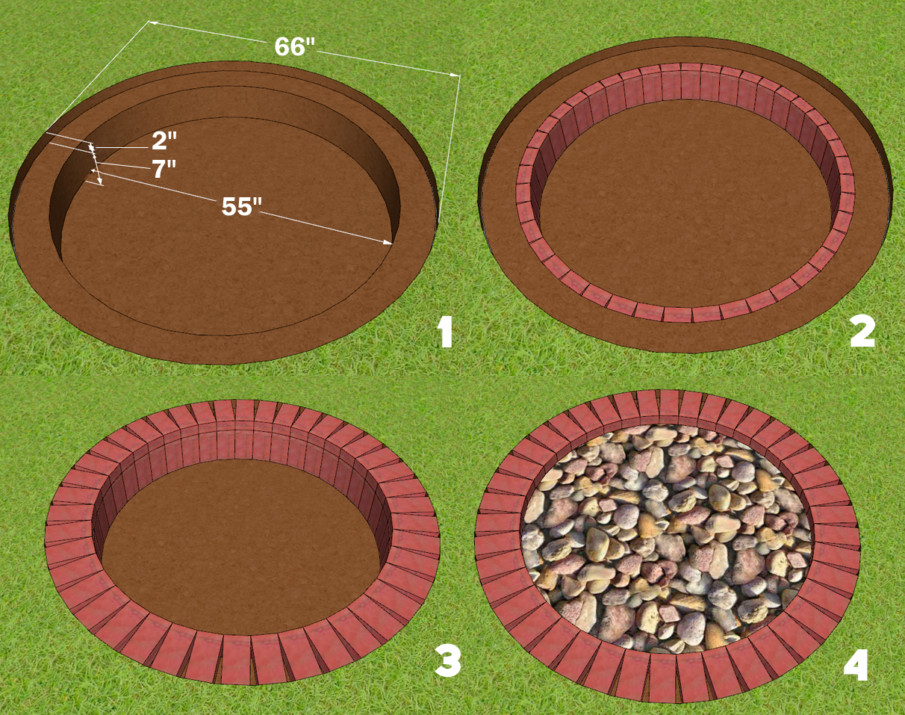
This is the largest in ground DIY fire pit plan, featuring a 66 inch overall diameter, which is reduced to 55 inches after accounting for a 5.5 inch lip around the edge. This design also does not require a brick bottom on the floor level.
Overall Diameter: 66″
How many bricks are needed: 84
Estimated cost: $.88 x 82 = $73.92 in bricks, plus the cost of small boulders.
Building Steps for Plan 4:
Dig a hole that is 9 inches deep and 55 inches in diameter. These are the complete dimensions. You will want to create a lip that is 2 inches deep and 5.5 inches wide, which leaves your main walls at 7 inches deep. Stand the bricks upright to form a wall around the circumference, as shown in step 2. Next, add your sunray circle of bricks as detailed in step 3. Fill the pit with rocks such as large river rocks, sauna rocks, or any kind of smooth, tumbled stone. These will retain the heat of the fire long after the flames have died down.
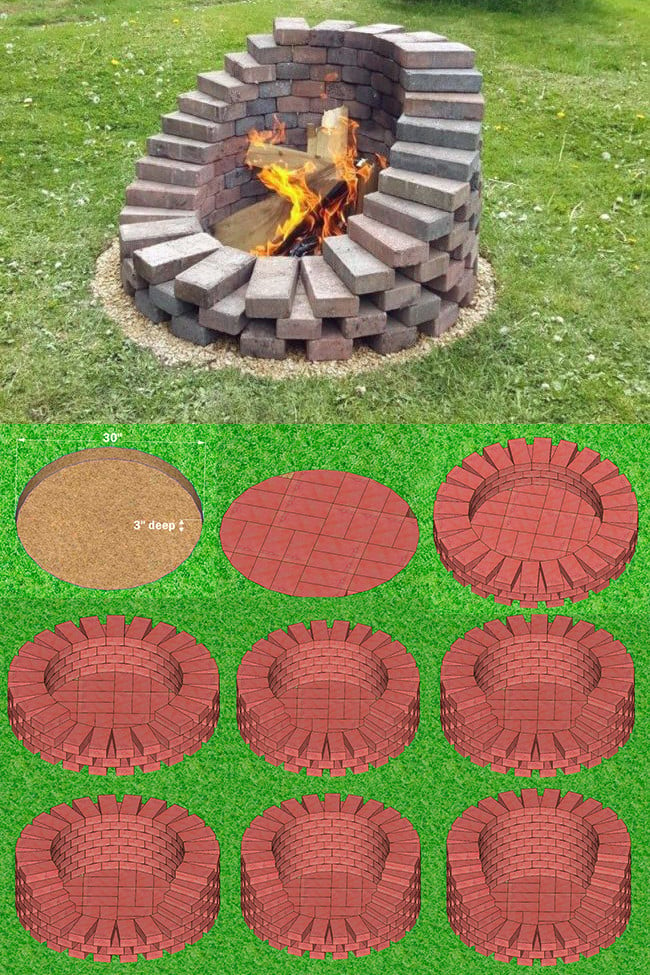
5. Small Pyramid Shaped Fire Pit Plan
Idea Picture 5:
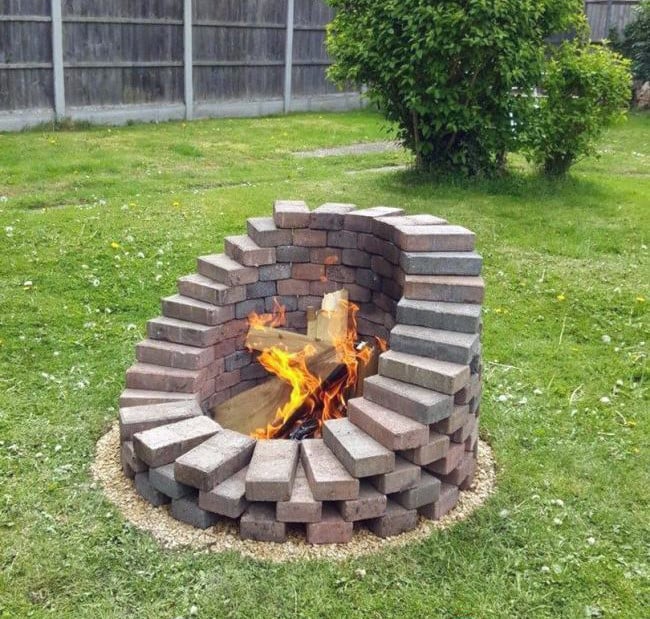
Take a close look at these plans. With many photos to guide you, it’s important to understand the process before you start. This fire pit needs to be built gradually, layer by layer, brick by brick. You’ll need to set aside enough time and avoid rushing. It takes as long as it takes, but the result will be well worth it.
DIY Plan 5:
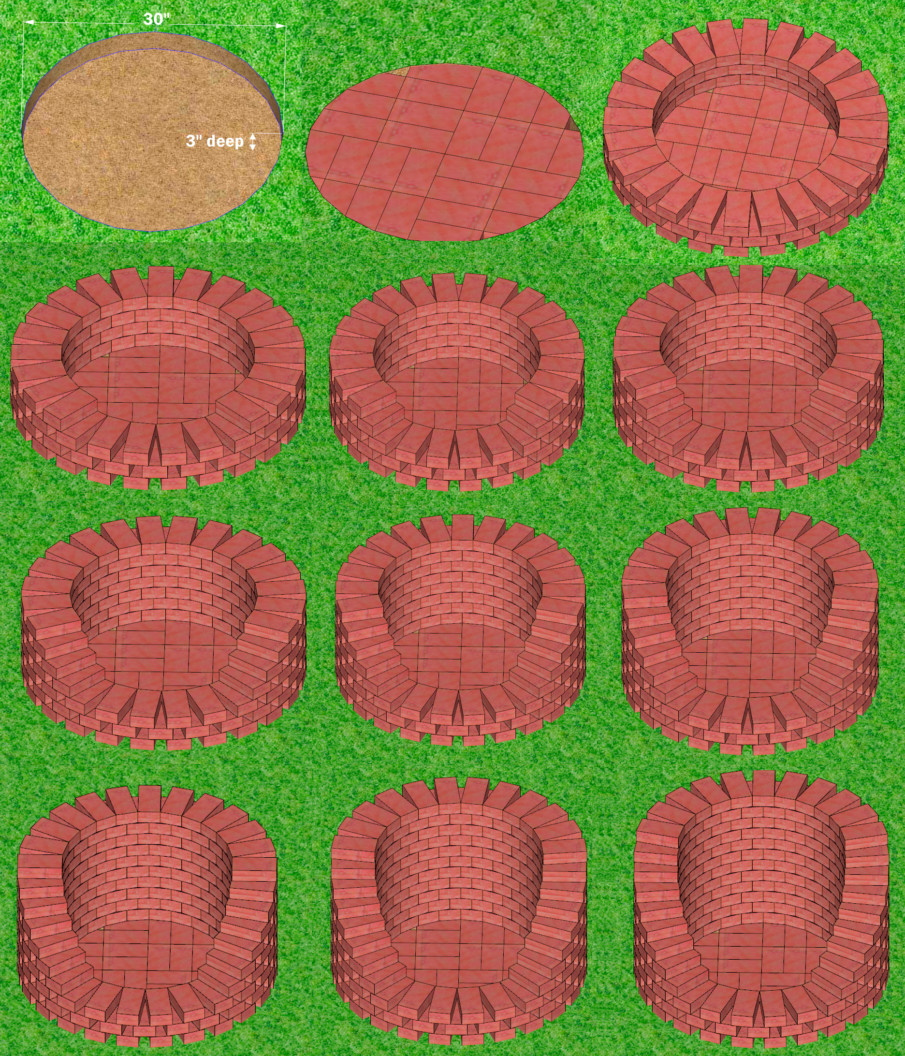
Overall Diameter: 30″
How many bricks are needed: 207 (without a brick bottom) or 235 (with a bottom)
Number of layers: 12
Estimated cost: $.88 x 207 (or x 235) = $182.16 (or $206.80) in bricks.
Please note that our plan has a slightly larger diameter of 2.5 feet, so the top layer consists of 11 bricks, whereas the original design shows only 5. However, the height remains the same, with a total of 12 layers above ground. You can add more layers if you want a taller pyramidal pit.
A pyramid design like this requires a solid, stable foundation for proper construction. You should create a well leveled floor using either gravel or, as recommended, bricks. As always, you’ll begin by digging the hole and laying the floor. If you opt for a brick floor, ensure the bricks fit together tightly.
The bottom floor layer requires 28 bricks, some of which will need to be chiseled to fit snugly. The next three layers are full circles, while the rest are partial. If you choose to build this pit on a gravel floor, you won’t need to chisel any bricks and can save nearly $25.
Here is the breakdown of the brick count:
floor layer – 28 bricks
next 3 layers – 24 bricks each
layer 4 – 19
layer 5 – 18
layer 6 – 17
layer 7 – 16
layer 8 – 15
layer 9 – 14
layer 10 – 13
layer 11 – 12
layer 12 – 11
Total: 207 (with no bottom) or 235 (with the bottom).
TIP: When assembling the pit, follow this simple rule: starting from the 5th layer, use one less brick for each subsequent layer.
Building Steps for Plan 5:
Dig a hole just 3 inches deep and 30 inches in diameter. The size can be flexible within reason. The first layer will be set in ground. Line the floor with tightly fitting bricks, using a chisel as needed to adjust their size. Alternatively, fill it with 1 to 2 inches of gravel and level it. Now, you can begin building your 12 layers of brick in a sunray design, ensuring the inner edges fit tightly to form the inner wall of your pyramid pit. The next three layers, each with 24 bricks, are complete sunray circles, totaling 72 bricks. These are stacked to create the outer design, making sure each new level overlaps the gaps in the previous one. Decide on the front of your pyramid pit and start laying progressively fewer bricks as you add more layers. Remove up to 5 bricks for the first open layer and continue this pattern to the final layer. In our plan, we built up to 12 layers above ground, with the last layer having only 11 of the original 24 bricks. The total number of bricks needed depends on how high and stable you want your firepit to be.
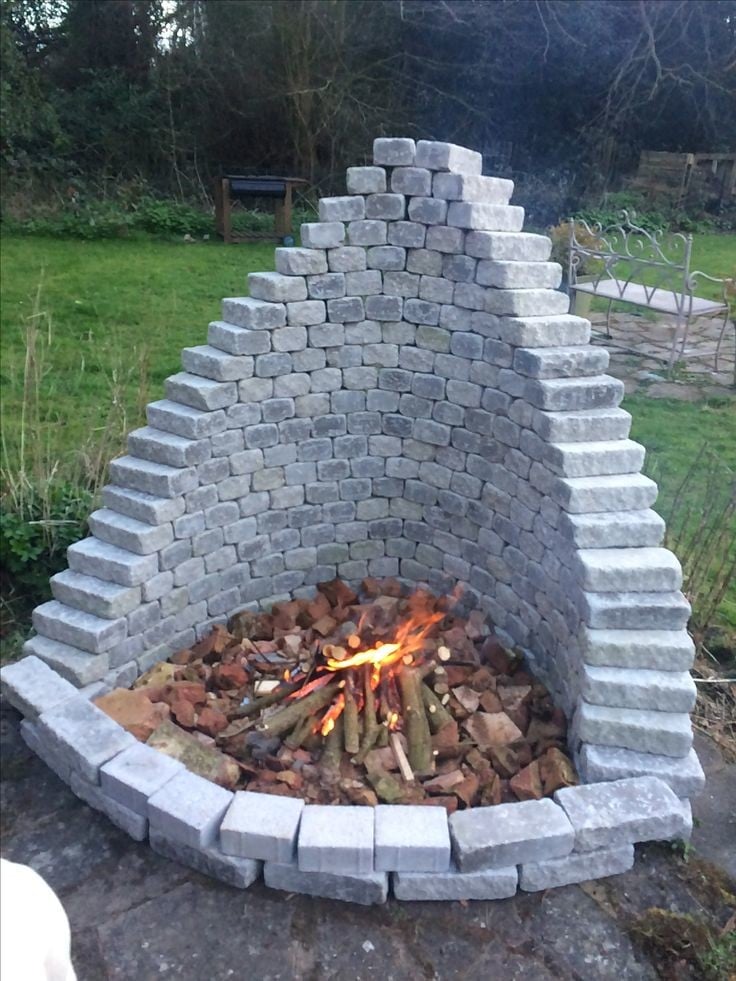
The Case of Tall Pyramid Shaped Fire Pit
Initially, there was a thought to include a design like the one in the image below. However, a closer look revealed that it requires masonry work, meaning you have to lay bricks with cement or another adhesive. This doesn’t align with the idea of a quick and easy DIY firepit. Additionally, its large size requires a significant number of bricks, making it quite expensive for a DIY project. Building this design by simply stacking bricks is not considered safe. At this height, a strong gust of wind could cause the entire pyramid to collapse. Even an accidental shift of a few bricks could lead to the pit failing. It’s believed that this idea is only feasible if the bricks are secured with some form of masonry glue.
While this design is certainly eye catching, not everything found on the internet is a good DIY idea. For these reasons, it is not recommended.
If you still decide to attempt it, this plan requires about 250 bricks and could cost up to $220 to complete all 21 layers as shown.
There you have it, five different backyard fire pit styles to choose from for your next DIY project. Some are incredibly simple, while others are more complex. Your choice will depend on your design preferences, as well as the time and money you wish to invest. No matter which you select, your new backyard fire pit will become a wonderful gathering spot for friends and family.
For your pinning needs: